Friday, December 2, 2011

Cookie of the Week...........Chocolate Cake Mix Cookies....YUMMO!

I have this really delicious, and EASY Cookie Recipe, and it's from a Cake Mix....now don't faint!  Yes, I like to take short-cuts too, hey our lives are so busy!  My friend Christine gave me the recipe, she made them one day, but use a Lemon Cake Mix.  I would have never known the cookies were from a Cake Mix if she didn't tell me. They were so yummy and the kids loved them.  You can use whatever Cake Mix you want, I often make the chocolate, because that's what my kids like, the lemon are so good too.  You can use the Vanilla Cake Mix and add chocolate chips, nuts, or peanut butter chips to the batter, and add whatever kind of flavor extract you wish, change it up some. If I was wanting to add chocolate chips and nuts, then I would add 1 tsp Almond Extract to the batter for something different. They're easy and a most delicious cookie, try them. 


Cake Mix Chocolate Cookies

1 Cake Mix, whatever flavor you choose
1/2 cup Oil
2 eggs
chocolate chips (optional)
walnuts (optional...use your imagination!)
NO WATER
Mix everything up, and put drops of dough on GREASED cookie sheets, and bake in 350 oven for 10-12 minutes.    YUMMO!

Thursday, December 1, 2011

Brittle Bar....Tis the Season of Baking....Get Started!

I love this time of year!  It's chilly outside, the Christmas Tree is up and decorated, the house is just about finished, and I want to start baking Christmas Cookies!  I have this great recipe for Brittle Bar, it's delicious, and EASY.  I love easy recipes, hey I'm busy, and I need all the help I can get.  My friend Kim gave me this recipe about 2 years ago, she made it for a church function, and I had to ask for the recipe.  It's made with.....are you ready....Saltine Crackers!  Yes, Saltine Crackers, so if you like sweet and salty, this is perfect for you!  You can bag them in those pretty treat bags, and give them away as gifts.  I know everyone loves receiving delicious treats as gifts this time of year,  or just let your family enjoy them.  I usually give one recipe away, and make an extra for my family!  Try this recipe, you will love it!

yes, these crackers!

Brittle Bar

1. Line a cookie sheet with foil and coat with veggie spray.
2. Arrange Saltine Crackers in a single layer covering the whole cookie sheet.

Arrange crackers and pour butter and brown sugar over

3. Melt in a sauce pan, 2 sticks butter with 1 cup Brown Sugar
4. Pour over the crackers, spreading evenly
5. Bake in a 400 degree oven for 5 minutes
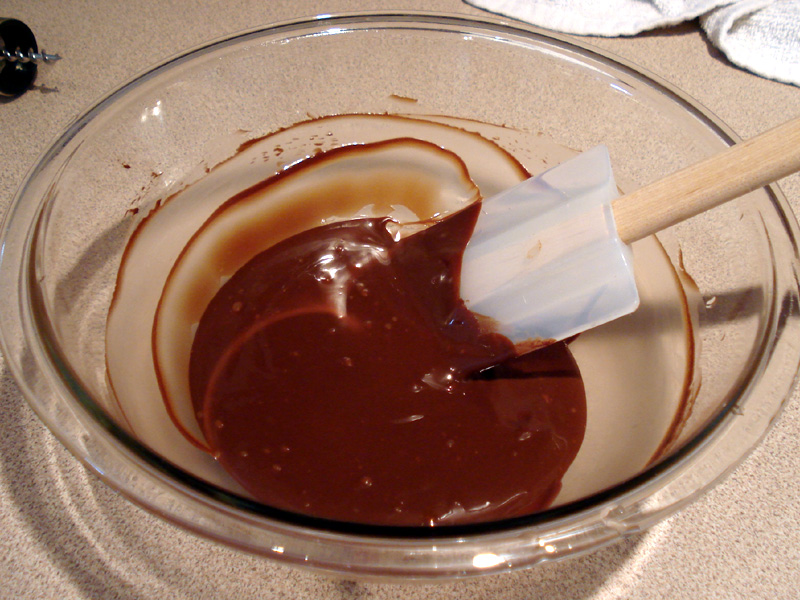
6. While baking - melt 1 bag of Chocolate Chips in Microwave (I like to add 1 TBS of shortening at   this point just makes the chocolate more creamy and easier to pour/drizzle)

melt chocolate

7. Stir until smooth making sure the shortening is all melted and combined.
8. Take tray out of oven and immediately settle crackers back into place
9. Spread melted chocolate over crackers
10. Sprinkle with chopped walnuts, or whatever nut you prefer

Spread chocolate all over and top with nuts, let cool!

11. Refrigerate for 1 hour or until hardened
12. Break into pieces
13. Store in a sealed container in the frig.

SO YUMMO!

Wednesday, November 30, 2011

Oven Baked Pork Spareribs! YUMMO!

It's finally feeling a little bit like Christmas today, the weather has been the in the 60's for the last 4 days, and just too warm if you ask me!  But today it's in the 40's, and chilly. Now all we need is some Snow!  I'm getting the house decorated for Christmas, it's almost done, still have a little extra touches to finish up.  Our Christmas Tree is done, and it's beautiful!

I love Spareribs, but they have to be tender.....pull apart, fall apart tender!  I have this great recipe that I've been making for years.  I don't use the grill, I use the oven, and they come out perfect every time.  Try this recipe for the most delicious, tender, and EASY Spareribs EVER!!!!

Oven Baked Pork Spareribs

1 Rack of Pork Spareribs about 3lbs
1 bottle BBQ sauce (or make your own if you wish)
2 cups water

Cut the Spareribs up into separated ribs, and put them in a roaster COVERED.  Add the water and bake in a 350 oven for 1 & 1/2 hours.  Drain all the water, and all the fat will go with it!  To the roaster pan add the BBQ sauce making sure all the ribs are covered.  Cook in the oven for another HOUR covered, the last 20 minutes UNCOVERED, this will add color, and everything will get all caramelized, and yummy!  EAT!  YUMMO!

Monday, November 28, 2011

Homemade Pizza!

Well, I've been under the weather now for 2 days.....coughing, sore throat, chest hurting, didn't even make it to church yesterday, and our choir sang, and I missed singing!  Now you know I'm sick if I miss singing in the choir!  Today I got up the usually time and got my kids off to school, even though I felt awful, but I'm a mommy, and that's what mommy's do!  My hubby is home and he helped out some, and I've let my house go, but I still managed to cook a nice dinner last night, Lentil Soup, which we all love, and it felt good eating something hot since I feel awful! 

I've been wanting to post my Pizza Dough recipe for some time now, but Thanksgiving got in the way. So, today I feel it's the perfect time to show you.  I love making Homemade Pizza, it's so easy!  My mom use to make Homemade Pizza for us when we were growing up, every Saturday, and it was delicious!  She would make 4 for our family, and there were never any leftovers!  Mom would buy the frozen pizza dough at the grocery store, and I use to, before I learned how to make my own.  Homemade Pizza Dough it's EASY, and so satisfying!

Homemade Pizza

The Dough - for 2 Pizza Pies!
1 1/4 cups warm water (warm water, NOT HOT)
2 TBS sugar
2 Tsp. Active Dry Yeast

In a bowl add the water, then the sugar and yeast...mix with a fork and let sit for 5 minutes until it gets all foamy, this is called "Proofing the Yeast".

Yeast all foamy
To the Kitchen Aid Mixing bowl add:
4 1/2 Cups Bread Flour (I use Bread Flour, but you could use Regular too)
2 TBS oil (I use olive)
1 tsp salt
Yeast Mixture already foamy


With the Dough Hook attached, mix on low.  Increase speed, and mix until all the mixture forms a ball around the dough hook, you may have to scrap the sides of the bowl down with a spatula. 
Dough hook with dough around it

Now look is the dough forming a ball around the dough hook like the picture above?  Or does it look like a "cake batter" in the bowl?  If it looks like a batter, add 1/4 cup more flour, you want all the dough mixture to be wrapped around the dough hook, that means it's done kneading.  Or, there may be extra flour on the bottom of the bowl, then you need to add a little more water. Take the dough out of the bowl, and work it a little with your hands, if sticky add some more flour to your hands.  Put in a well oiled large bowl, let rise for one hour.


These are the tricks to bread making, if you don't have a Kitchen Aid Mixer, you can use this same method, just the OLD FASHIONED way.....knead with your HANDS!!!!

When the dough is done rising, it will double in size, push down.  Divide it into 2 , and let sit for about 5 minutes, will be elastic and easy to spread. Spread each loaf onto a greased pizza pan or stone. You don't need a rolling pin, use your hands. Now it's all ready to be TOPPED!


Toppings for the Pizza - makes 2 pizza pies!

About 1 cup or more Tomato Sauce - sometimes I even use jar Tomato Sauce!  Now don't faint!!!!
4 cups shredded Mozzarella cheese
1/2 cup Parm cheese
Italian seasoning to taste
Garlic powder to taste

After spreading the dough onto your pizza pan or stone, top each pizza with 1/2 cup sauce (if you like more, use more), then top each with 2 cups of the shredded Mozzarella cheese, then sprinkle on the Parm cheese, Italian seasoning and garlic powder to taste.  Use your imagination, do you want meatballs or pepperoni, mushrooms on your pizza?  Go for it!

Bake in a preheated 450 oven.  Put one pie on the top rack and the other one on the bottom rack, the top rack pizza will brown lightly on the top and melt the cheese, and the bottom rack pizza pie will brown the bottom crust, so you need to switch them around during the baking time, get a long spatula, and look at the bottom crust, is it browning to your liking?  Yes, then switch them around so the top racked pizza pie bottom crust gets brown, nothing like a soggy pizza bottom crust!!!!

Take out, and cut and ENJOY!  YUMMO!

Saturday, November 26, 2011

Christmas is coming.....In Less than One Month!

Today we're going to cut down our Christmas Tree....yes a Christmas Tree, not a Holiday Tree, but a Christmas Tree!  We usually go early on in the Christmas Season, I like to decorate our house early, so we can enjoy it during the whole month of December!  I love Christmas, and enjoy all the festivities, and my kids love it too. 

The kids with their Gingerbread Houses 2010

We'll start our Gingerbread house's soon too, last year I let my kids decorate 2 each, all by themselves, yes, no help from Mom, and their creativity really came out!

Preparing to make the Gingerbread Houses 2010

We'll start our cookies in a couple of weeks, it's a whole family affair, they all just love it....even my hubby! 
Sugar Cut-Out Cookies 2010

Becca decorating her Gingerbread Cookies

Aren't they cute?

Hubby and Davey making the roll out cookies!


Tomorrow we decorate the tree, and house for Christmas.....Enjoy! 

Friday, November 25, 2011

What to do with all those LEFTOVERS?......Why Turkey Pot Pie Of Course!!!

Well, it was a wonderful day.  Thanksgiving came and went so quickly.  Seems like we were preparing for weeks.  We went to my sister's house, and it was a very nice day.  The food was delicious, it was good seeing my family. My sister made all the fixings, I especially loved her "Acorn Squash" it was delicious!  Mom made her Apple and Pumpkin Pies, and my sister-in-law, Beth made her Pumpkin Bread.....and I made Pecan Pie, Dinner Rolls, and Sugar Cookies, everything was so YUMMO!  I could really go for a roll or piece of pie right now.


How did your dinner come out?  I'm sure you all did a terrific job!  I missed my hubby, he had to work, it was weird traveling, and eating at the table without him, and especially watching the "Cowboys" not by his side!  But I'm counting my blessings that my hubby has a good job, and he will be off for Christmas!


 Now with all those leftovers, what are you going to do with them all?  How about a Turkey Pot Pie?  I have a great recipe, it's similar to my Chicken Pot Pie, that I posted a few months ago.  I would love to make one tomorrow, but we have no leftovers!  YUMMO!


Turkey Pot Pie

The Pie Crust
2 1/2 cups all purpose flour
1 cup shortening
1 tsp salt
1 egg
water
1 tsp. vinegar

In a large bowl put the flour and salt, and shortening, then using a pastry cutter or 2 knives cut the shortening into the flour and salt. Using a liquid measuring cup, break one egg into it, and then fill it to the 1/2 cup line with ice cold water, and add 1 tsp vinegar.....YES vinegar......it will be fine you'll see. Mix it with a fork, then add it to the flour/shortening mixture and mix together with with a fork, then get your hands in there and gather the dough together don't be afraid, this pie dough recipe you can work the dough and it will still be flaky!At this point you may need a little more water, depends on the weather. Form into a round disk, if it's too wet, add a little more flour, too dry, add very little water....it will be sticky, but not overly sticky.....all depends on the day and humidity.......wrap in plastic wrap and put in the frig for about 1/2 hour, or you can even leave it in there for 2 days, or freeze it for whatever pie you want :)

The Filling
About 2 cups COOKED shredded Turkey
2 cups milk, 2% or whole
4 TBS cornstarch
2 cups water with 2 TBS chicken bouillon added
4 TBS butter (don't worry you're not gonna eat the whole pie, well maybe you will)
salt and pepper to taste
1 cup shredded cheddar cheese
2 cups mixed frozen veggies (corn, peas, carrots, whatever)

In a large pot, add the milk, cornstarch, add the water with the bouillon mixed, salt, pepper, butter,.whisk constantly, but watch it, keep whisking, you don't want it to burn.....it will start to bubble and become thickened, take off heat and add cheese, stir let it melt, and then add the COOKED Turkey, and veggies, taste it, what does it need? More salt, pepper...Taste your food, make sure it's well seasoned!  Stir.....COOL... now the pie crust

Take the pie dough out of the frig, and on a well floured surface, cut the dough disk in half, take one of the halves and roll out, this is the bottom of the pie. Make sure you have a dusting of flour on the bottom and top of the dough before rolling, and on your rolling pin...roll out to a rectangle since you will use a 9x13 dish, or a round dish if you want to use a deep round casserole dish. Keep rolling take your time if it sticks add a little more flour, moving the dough so it doesn't stick, move it around after each roll with the pin. Put it on the bottom of a 9x13 dish, then add the cooled filling, and roll out the top pie crust the same way, lay it carefully over the filling, seal the edges, and cut three holes in the top crust for vent holes. Bake in a 350 oven for 40 minutes until you see it bubbling and light brown. Let sit for 10 minutes before servings......SO YUMMO!!!!.

Wednesday, November 23, 2011

Counting Down to Thanksgiving......A Great Appetizer...Stuffed Mushrooms!

I can't believe Thanksgiving is tomorrow, actually it feels more like Easter than Thanksgiving, it's just too warm here in Northern New Jersey!  It would be nice for some colder days to roll in, just makes the holiday feel so festive, especially when the fire is going.

Here's another great appetizer for your Thanksgiving Feast, Stuffed Mushrooms.  My Stuffed Mushrooms are so delicious, and EASY!  Actually this recipe is my mother's but she never used lemon juice in her recipe, but I think the added lemon juice really adds flavor. 

I like to serve appetizers for Thanksgiving, but the meal is so heavy, and when my family comes, I want them to eat a little bit before dinner, you know while I'm in the kitchen getting the final things done, and they all can just mingle around and munch. But I don't want to serve "heavy" appetizers.  Stuffed Mushrooms are perfect, they are light, and I think everyone loves them. I usually serve them with tomato juice, and a tray of cheese and crackers. Usually around Thanksgiving, the grocery store has those big "stuffing mushrooms", I love those, and they are big enough to hold a lot of the stuffing.  Try my Stuffed Mushrooms, you will love them! 

Stuffed Mushrooms

About 20 big White Button Mushrooms (if you have a crowd, double the recipe)
3 cans Minced Clams - sold by the tuna fish
1 stick butter
1 1/2 cups bread crumbs or more
2 tsp. oregano
2 tsp. garlic
1 tsp. dried parsley
salt and pepper to taste
4 TBS Parm Cheese
2 TBS Lemon Juice

With a damp paper towel, rub the dirt off the Mushrooms, and carefully pop the stems out.  In a frying pan, melt the butter on med heat, add the clams, bread crumbs, oregano, garlic, parsley, salt and pepper, Parm cheese, and lemon juice.  Mix up, is the mixture dry?  Add some water, if too wet, add more bread crumbs, you don't want it crumbly, it should look like stuffing and moist enough to hold together to stuff a mushroom. Taste it, what does it need, more salt, pepper, more lemon juice? Taste your food, make sure there's enough seasoning in it!  Stuff each mushroom generously, and put on a cookie sheet, or a 9x13 dish, and bake in a 350 oven for 20 minutes, until the mushroom is soft.

Hint....I always make these a couple of days before, they hold great in the frig, but bake them the same day you make them, and heat them up in the microwave or oven right before everyone comes to dinner!  YUMMO!

Tuesday, November 22, 2011

Counting Down to Thanksgiving.....Baked Brie with Strawberry Jam and Almonds!


Here's another appetizer that I love to make, and it's one of the easiest around.  It's a Baked Brie!  It's so simple, but whenever I make it, I "WOW" everyone.  Baked Brie is truly a most delicious appetizer.  I know, Brie is an expensive cheese, but I buy a nice size round in Costco, so much cheaper than at the local grocery store.  I wrap a whole Brie round in 1 sheet of puffed pastry, but first I spread strawberry jam on both sides, and top it off with either almonds or walnuts.  So delicious, and EASY!  Try it!

Baked Brie with Strawberry Jam and Almonds

1 6 inch round of Brie
1 sheet of puffed pastry thawed
4 TBS strawberry jam, or whatever kind you prefer
1/2 cup chopped or sliced almonds or walnuts whatever nut you prefer
1 egg and 1 TBS Water for Egg Wash

Unroll the puffed pastry and put it on a floured board, and just roll it out to get rid of the lines from the fold.  In the middle of the pastry, put 2 TBS jam, spread it in a circle, about the size of the Brie, top with 1/4 cup of the nuts. Take the Brie out of the package, and keeping the white part on, put it on top of the jam and nut mixture, and add more jam and nuts to the top side of the Brie.  Fold the Puffed pastry up around the top side of the Brie, folding it into a neat package.  Turn it over, the bottom will now be your top, since it's smooth and prettier.  Put it on a greased cookie sheet.  Crack the egg into a small bowl and add 1 TBS water, and mix, brush it all over the package puff pastry Brie,.  Now you can either bake it in a 375 oven for 20 mins or put it back in the frig and pop it in the oven right before your guests come. Serve with crackers on a pretty platter. YUMMO!

Sunday, November 20, 2011

Counting Down to Thanksgiving..........The STAR of the DAY....Turkey 101

What are you all making for the big day?  Like I have said in my previous posts, we are going to my sister's house this year, but I'm not completely off the hook, I am bringing my Homemade Dinner Rolls, Pecan Pie which I posted a couple days ago, and my Homemade Sugar Cookies.  I enjoy cooking and baking for Thanksgiving, but I am so relieved that my sister is hosting this year!

Today I am sharing my secrets in making a most delicious moist Roasted Turkey, and some tips I have with the timing of how to get the meal on the table all at the same time.  I love roasting a Turkey, I find it easy!  I don't use the gizzard or "stuff in the bag". Yes, I know, some of you like using them in your gravy, or even stuffing, but I would just rather throw them out!  Please don't be intimidated by a big 20lb Turkey, it's just like roasting a big chicken, and you all know how to roast a chicken, cause I already showed you!

Roasted Turkey 101

20 lb Turkey (I like to use a Butterball)
1 stick of butter
3 cups hot water mixed with 3 TBS chicken bouillon
Salt & Pepper
Dried Rosemary (optional)
4 TBS flour
Cold Water and a jar with a lid for the GRAVY

1. Timing is the key, you want the Turkey to be done cooking about 1 hour before you eat, so the oven is free to put the rolls, stuffing, and other delicious food you so lovingly prepared.  You want all your food to be done at the same time, not waiting around for the stuffing or rolls to bake in the oven. And you can have your mashed pots done already, like I showed you in a previous post.

2. How many pounds of Turkey do you have,,,,20?  Then that bird needs about 3 1/2 - 4  hours to cook unstuffed, I never stuff my turkey.  I like the stuffing in a casserole dish. But if you want to stuff your bird, by all means please do so. It will take longer to cook.  So, say you want to eat by 2pm on Thanksgiving Day, then you need to put your 20lb Turkey in the oven by 10:30 that morning,

3. After you have rinsed your bird, and take the bag out of the cavity the night before, and made sure all is well. Pat dry with paper towels, be careful to wash your hands when done, cross contamination!  Put it in the roasting pan you want to roast it in.  Put it back in the frig and let it sit covered with foil for the night in the frig, kind of airing out,  Then in morning let it sit out on the counter 1 hour before you put it in the oven, to come to room temperature. 

4. Melt about 1 stick of butter, and brush your bird with the butter generously, salt and pepper very well, hey, it's a big bird, making sure all the parts are well seasoned,  I like to add a little dried rosemary too....adds flavor.  You will have some butter leftover, put it in a small pot and add the 2 cups of chicken bouillon mixture, and heat up, this will be the basting liquid.

5. Preheat the oven to 325 degrees, and put the Turkey, UNCOVERED, in the oven, making sure the racks are in the lowest position. I never cover my Turkey, I want it golden brown.  Let the Turkey cook, and bast it every 1/2 with the basting liquid, this is the key for a moist bird! 

6. After about 3 hours get your handy meat thermometer and test the temp, stick it in the deepest part of the thigh....how's it cooking, almost to 160 degrees?  Almost done...I like to cook my turkey to 170 cause then when it sits for that hour on the counting waiting to be carved it still cooks, but you want the meat to be white, NO PINK, and when you poke it, the juices MUST BE CLEAR!!!

7. When the temp reaches 170, take the bird out and sit on your counter, in the pan, and cover with foil.  When it cools some you can remove it and put it on a cutting board, and then pour the liquid goodness in a large saucepan to make your gravy!  Now get those Dinner Rolls and stuffing, and whatever else you have in the oven to COOK!

8. One half hour before ready to serve, take the bird out of the roasting pan, and put on a big cutting board.  Pour the roasting liquid into a large saucepan, and the leftover basting liquid, bring that liquid to a boil for about 3 mins. Now find a special person to start carving the bird, while you make the gravy.

The Gravy

 While the liquid is boiling for 3 mins, get your handy gravy jar out and add 4 TBS flour, and fill the jar with cold water, shake really well.  While the liquid is boiling, while whisking, add the flour/water mixture slowing, keep whisking so it doesn't form lumps.  Lower the flame to Med, is the gravy getting thick? Lower the flame to simmer and simmer for 15 minutes.  Now is the gravy at the right thickness?  Or do you want it thicker, then add 2 TBS  flour and about 1/2 cup water to the jar, and shake and add it slowly to the gravy, whisking, but not too much, it will get TOO THICK.....if it's too thick, add a little water.  Taste it, what does it need, more salt, pepper, some chicken bouillon?  Add it, use your taste buds to help you make your gravy....that's what good cooks do, they taste their food! 

While your gravy is done and simmering on low, and your special person is carving the bird, now you can be getting all your serving dishes filled with the glorious meal, putting ice in the cups, pouring the drinks.Yes, do all this before everyone sits down!  Be organized, light the candles, is everything in place?  But not the food, the food should never be on the table before your guests sit down...it will not stay HOT....people like small-talk, they don't always rush to the table, you may have a slow, "never stop talking person" at your dinner, so wait.....

Call everyone to the table, and don't put the food on it yet, let everyone sit first.  Pray, give thanks to our Lord for all His blessings, and for His faithfulness.  After the prayer, as the hostess, stand up, and take another  special person , but not your hubby, with you and bring each dish to the table giving it to your guests first, and one by one they can pass the food around, until everyone is served, I find this so much easier than putting the food on the table, reaching for this and that, you may overlook something.

Most of all enjoy the meal, enjoy your guests, sit back, relax, don't be up-tight, your guests will feel uncomfortable. This is Thanksgiving, it took you FOREVER to cook this meal!  Enjoy it all!

Have a wonderful Thanksgiving, we have so much to be thankful for! 

Friday, November 18, 2011

Baking for our Northwest Christian School's Annual Craft Fair.....Pumpkin Bread!

I've been baking all day, so it seems.  My son Davey's school is having their Annual Craft Fair this coming Saturday. Each family helps out and bakes four homemade items.  Now you all know I love to bake, so of course this can be easy for me. I baked two Marble Pound Cakes, and two Pumpkin Breads.  I just love these recipes, because they are easy, but delicious, and hope that someone snatches them up at our Bake Sale Table, at our Annual Craft Fair. 

So, if you live anywhere in Sussex County, New Jersey come on over to the Northwest Christian School Annual Craft Fair, at the Sussex County Fair Grounds, this Saturday, November 19th, at 10am to 4pm. You will love all the homemade crafts, delicious food, which includes homemade Chicken Noodle Soup (which I helped make) homemade Pea Soup, and homemade Beef Chili....and of course the Homemade Baked Goods, and it's FREE ADMISSION!

Here's my recipe for my delicious Pumpkin Bread, you will love it, and it's also great for a Thanksgiving treat!

Pumpkin Bread

3 cups flour
2 tsp. baking powder
2 tsp. baking soda
1/4 tsp. salt
2 1/4 tsp. cinnamon
1 tsp. nutmeg
1/2 tsp allspice
1/4 cup vegetable oil
3 large eggs
1 cup sugar
1 cup brown sugar
1 2/3 cups buttermilk
2 cups canned pumpkin

In a large bowl combine all the dry ingredients, and whisk to combine.  In a mixer add the oil, eggs, sugar, brown sugar, buttermilk and canned pumpkin, mix really good, add the dry ingredients slowly.  Pour into 2 greased loaf pans and bake in a 350 oven for 50 mins or until a toothpick comes out clean.  YUMMO!